Wednesday, September 8, 2010

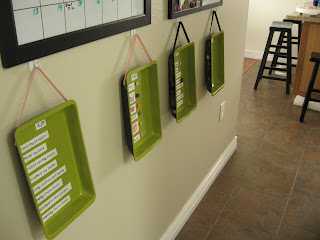
Children's Responsibility Checklists:

Okay, so I was nosing around
over at Pickup Some Creativity
and I saw this
I love that the kids helped out in the making
of them and each checklist
was specific to the childs ability. 

Very cute!

Cute & Frugal Organization:

I saw this at Pickup Some Creativity
and thought it would be a great idea
for an office
or a childs study area.

A great way to decorate
and embellish your space when you have
a budget of about $0.  :-)
See the step-by-step tutorial here.

Sunday, September 5, 2010

Great frugal decor:

I saw this wonderful idea at Sew Totally Smitten.
This is perfect for someone
with a decor budgt of $0! (me)
:-)

Back-To-School flowers:

This is so cute and perfect if you need a teacher gift! 
Check it out here.

Saturday, September 4, 2010

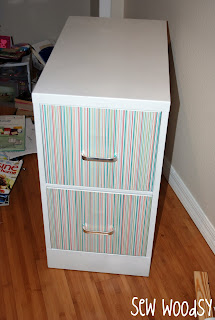
Modge Podged file cabinet:

If you follow The CSI Project at all
then you might have noticed this project this past week. 
I always thought that these file cabinets were so blah. 
This is a great idea that I may have to use.
Sew Woodsy shows you how step-by-step:

Friday, September 3, 2010

Pretty Pottery Barn knock-off:

A few years ago I began refurbishing
old, brassy, ugly chandeliers
and turning them into this:
I'm adding a few things to this for a special friend
and her new baby.
These look GREAT in a nursery
and they give off great light.
I sell mine at local stores for about $60-$70 each.
You can get one at Pottery Barn for about $150-$180
I re-wire, re-paint and bling 'em out.  I love to do them.
Here's another:

Wednesday, September 1, 2010

Awesome Fall Pennant:

We recently had our daughter
Autumn's 3rd birthday party. 
I have a pennant banner made of fabric
that I put up every year. 
I like it so much that I was just thinking
I should make one for fall. 
I saw this today from a new blog (new-to-me)
I discovered
Land of the Misfit Toys
(I love the name).
Michelle's pennant is actually made for outdoor use. 
Check it out!
Here is another banner creation
from Michelle at Land of the Misfit Toys.
Here's another I found from Creative Passage:
Very creative. 
This gives me lots of ideas and motiviation. :-)

Tuesday, August 31, 2010

Awesome Leggo Table:

We love Lego! 
I saw this at The Gaines Gang.  So cool.
I want to make this so bad for my two little ones.....

A fun alternative to a cake:

I first saw this idea on Everyday Celebrating. (love her ideas!) 
Although, it was originally featured on Taste of Home online.
I was looking for something fun and different
for my sons 5th birthday.
He was excited (of course) when I told him he'd have a
donut cake tree!
Here's the version we made:

My son shares his birthday with St. Patrick's special day.

This was really fun, frugal and easy.  We just ordered the donuts ahead of time from a local bakery and requested special sprinkles for our theme.  I had the little poms on hand from a previous New Years cake.  I try to save things like that...I'm glad I did!  They were the perfect touch.
Our guests loved the idea.

The Dinosaur Play Mat...and beyond!

A big THANK YOU to the ladies at Serving Pink Lemonadefor this wonderful Dinosaur Playmat tutorial.  I'm not the most fantastic seamstress but this was so easy! In fact,  it was so easy, that
I made a few other versions.  Here is the picture of theirs:
These were great for our 16 hour trip to North Carolina.
Here is a picture of a few others I came up with:

The airport.
Pretty basic but it was 3am when I began this one.  Aah!

The construction site.
I bought some little rocks at the Dollar Tree
and this has been the favorite. 
The little blue square is actually a gas pump. 
It needs a handle but I just haven't gotten there yet.

Finally...

The ocean.
I found these little plastic toys at Michaels on sale for $2.99. 

I bought some decor shells at the Dollar Tree and voila!
Thanks again to Serving Pink Lemonade.
We had a great time!

Thursday, July 8, 2010

So cute frugal yard flag!

I love this flag. I was just thinking last week that I needed a new flag in the yard. I was thinking about getting some good fabric and making my own...but...this idea is way better! Simple, easy, and cute.

Tutorial from 1luckee girl here.
Lots of other cute stuff there too.

Tuesday, June 22, 2010

Patri-botic Centerpiece

I saw this in my Family Fun magazine
and had to make it right away.
Very cool and creative.  The kids love the little robot! 


Go HERE for instructions and supplies.  Have fun!


Frugal Decor: cheap Target shelves


I'm sure everyone know these cube shelves from Target. 
They're really cheap and come in so many options.
Here's how I jazzed mine up for my daughters room.


Here are the supplies you'll need: Glue (I like the Beacon Frabric glue the best-found at Wal-Mart)
Ribbon to coordinate with room colors.  The amount of ribbon will depend on how large your shelves are.
There are many different sizes available.

Add a line of glue to your ribbon....


Press the ribbon-glued side of course to the front edge of the shelves....
If glue seeps out of sides of ribbon- which it probably will - wipe it right away!


I would very much recommend that your ribbon be flat or flush to the tops of every shelve.
If your children are young they will be tempted to pull at any ribbon edges that stick out.
I tried to demonstrate this with a book.  :-)


Perfect for books and most toys.


Easily wipes clean.


My daughter uses the top to play on.  It's the perfect size.


Hope you enjoy this frugal decor idea.

Saturday, April 17, 2010

make your own hair clips

  FYI: I took these pictures as I made the clips at about 1am on my TV tray, right in front of the TV, so the volume of my DVR'd  CSI wouldn't wake anyone.  The pictures aren't the best- sorry.

 I know there are many tutorials on this out in blog world but I figured since I was making & posting these I should add mine in too. 

 
You'll need: 
-ribbon you like
-buttons or little jewels
-glue
-clips (I got my package at K-Mart for less than $5)
-fabric flowers (I picked mine up from the Dollar Tree
and the white ones were actually scrapbook embellishments)


Here is the glue I love to use on pretty much everything.


 Cut your ribbon a little longer than you'll need-just in case and add your glue down the middle.


 Wrap the gluey ribbon strip around the inside and over the top of the clip.  I always leave the bottom
(the part that sits on the head) free of ribbon.  This will help it stay in the hair better.

Proceed with the gluey ribbon all the way around and snip it off after you have come to the bottom
of the "V" or spring piece. I like to singe my ribbon edges with a lighter just to be sure they don't fray.


Here is what you are left with.  Now use the same glue to add your flowers and button on top.  You'll have to completely take your flowers apart.  Sorry I should have taken a picture of that part. (my first post) 
I only used two layers of the flowers because I didn't want them too big and fluffy.


 This will be your end product.  Cute and affordable.

Tuesday, April 13, 2010

This looks awesome!

I haven't made meatloaf in years--really.  This recipe looks yummy and frugal, although I don't think I would put the pasta inside the meatloaf.  
Recipe here